Proportion and composition in outfits
This is part of the guide How to Put Together Outfits — a closer look at the second group of principles: lines, proportion, and composition.
Fit
How it works. Sometimes the problem with an outfit isn't color, proportion, or style at all — the piece just fits badly. Good fit often shapes the impression more than price, brand, or how on-trend a cut is.
Check the sleeve and trouser length, the shoulder line, where the waist sits, and how the jacket fits. On trousers, check the inseam length, any pulling around the crotch seam, and bunching near the pockets. Watch for stray creases, fabric strain, and whether a loose cut looks intentional — oversized and simply too big are not the same thing.
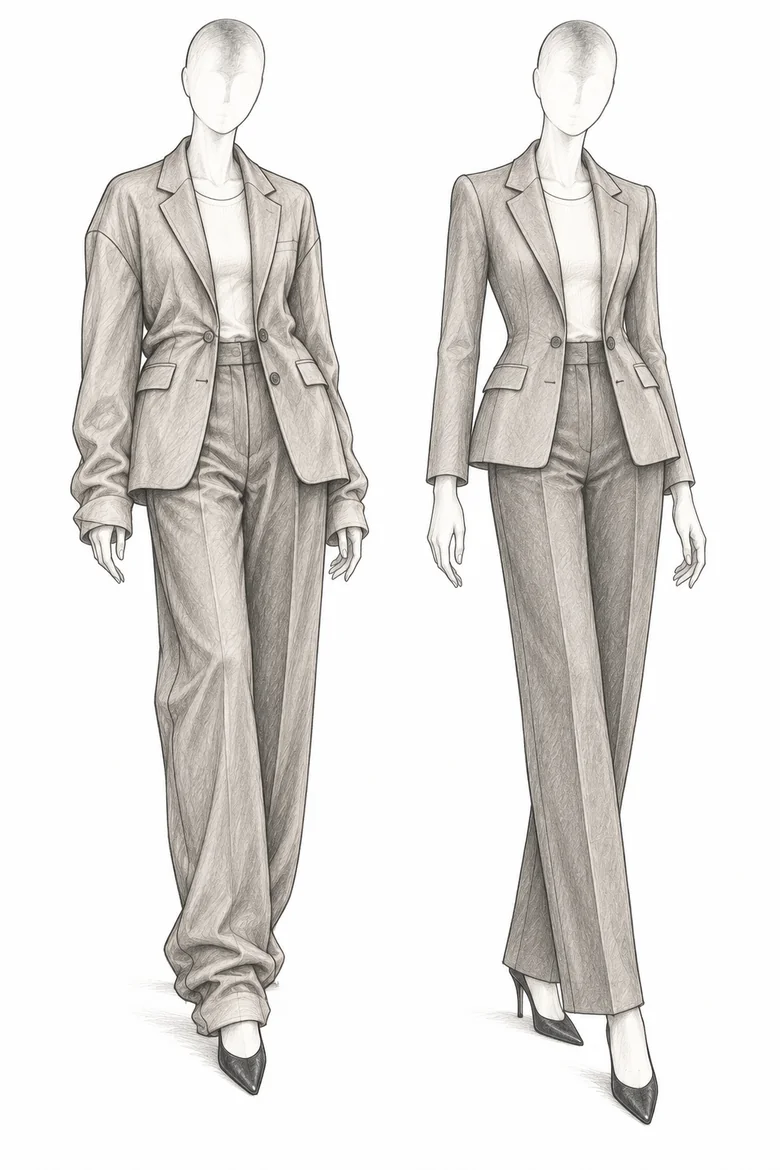
Who it's for. The principle is universal, but it matters most when standard sizes tend to fit well in one place and badly in another — trousers that sit right on the hips but gape at the waist, say, or a jacket that's right in the body but sits off at the shoulder.
Strengths and limits. A small alteration can sometimes save a piece that almost works, instead of hunting for a new one. But not everything can be reworked: shortening trousers or sleeves is relatively easy, while altering a complex construction, knitwear, or very stretchy fabric can be difficult or not worth the cost.
In practice. Before giving up on a piece, consider whether a tailor could fix the specific problem. The most common alterations are trouser and sleeve length, the waist, and how a jacket sits. But first check that you actually like the piece and that the fabric and construction suit an alteration — good fit won't rescue something you don't want to wear anyway.
Kibbe types
How it works. David Kibbe's system looks not just at individual proportions but at your appearance as a whole — line, scale, geometry, and the balance of softness and sharpness. In the classic version, these traits are described through the ratio of "yin" and "yang": soft, rounded lines versus sharper, more geometric ones.
You can use the core idea without pinning down a specific type: compare the lines of your clothes with the lines of your own features. Look at whether a soft or a structured shoulder works better, longer unbroken lines or shorter, broken-up ones, larger or smaller details.
Where it comes from. David Kibbe laid out the system in his 1987 book Metamorphosis. It found a wide audience again in the early 2020s through social media, and in 2025 Kibbe released a new book, Power of Style.
Who it's for. Anyone who wants to understand why pieces that are similar in color and style look different on different people, and who's mostly interested in silhouette and cut. You don't have to determine your type — you can borrow individual observations from the system when comparing specific pieces.
Strengths and limits. The system's strength is its attention to the whole person and to how the lines of clothing interact with the lines of your features. But typing itself is subjective and has a high barrier to entry: even people who study the system in depth don't always find their type easily. So Kibbe is more useful as a source of ideas than as a list of allowed and forbidden cuts.
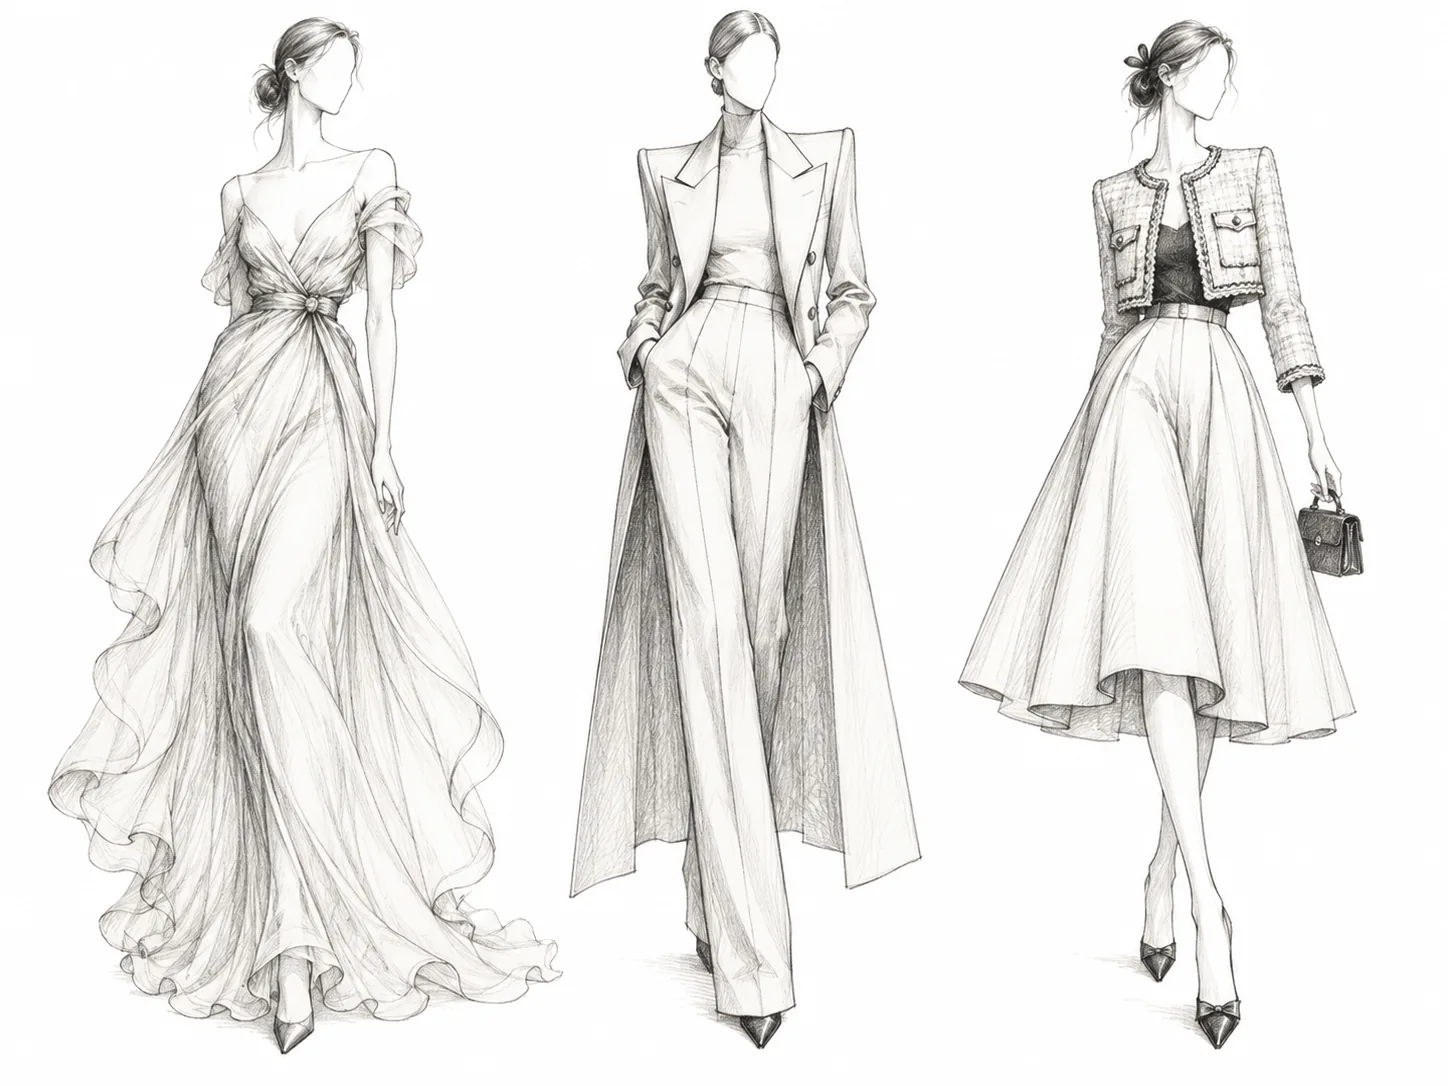
In practice. Instead of "what's my type?", try comparing a few specific traits: a soft versus a structured shoulder, a long versus a cropped silhouette, large versus small details, a looser versus a more tailored cut. Photos of different outfits side by side often reveal patterns better than trying to slot yourself into one category right away.
Body types: apple, pear, and hourglass
How it works. Classic body-type systems sort bodies into a few loose shapes — hourglass, pear, apple, rectangle, inverted triangle. Each category comes with ways to visually balance the proportions: add volume where there's less of it, emphasize the waist, or bring the silhouette closer to a notional hourglass.
Who it's for. As a simple starting map of proportions, this can help: it draws your attention to where the waist sits, the shoulder-to-hip ratio, and the overall balance of the silhouette. Using it as a table of allowed and forbidden cuts is far less helpful.
Strengths and limits. The main advantage is simplicity: it gives you a clear language for talking about proportion. But that simplicity has a downside. When one body type starts to read as the ideal and the rest as something to "fix," the system becomes too prescriptive.
Rigid categories also handle individuality poorly and can feed body dissatisfaction. The modern approach increasingly shifts from "correct the figure" toward which proportions, silhouettes, and accents a person actually likes.
In practice. Use body type as a cue, not a rule. Look at your proportions and decide what you'd like to emphasize. Then compare specific cuts and fit on yourself, rather than following universal "dos and don'ts."
The rule of thirds
How it works. The rule of thirds is built on the idea that a silhouette can look more balanced when a horizontal line divides it not in half but at roughly a 1/3-to-2/3 ratio. That line can be the waist, the hem of a top, a belt, or an outer layer.
A 1:1 split can emphasize the horizontal more and make the composition feel static, while an uneven split helps visually shift the ratio of torso to legs.
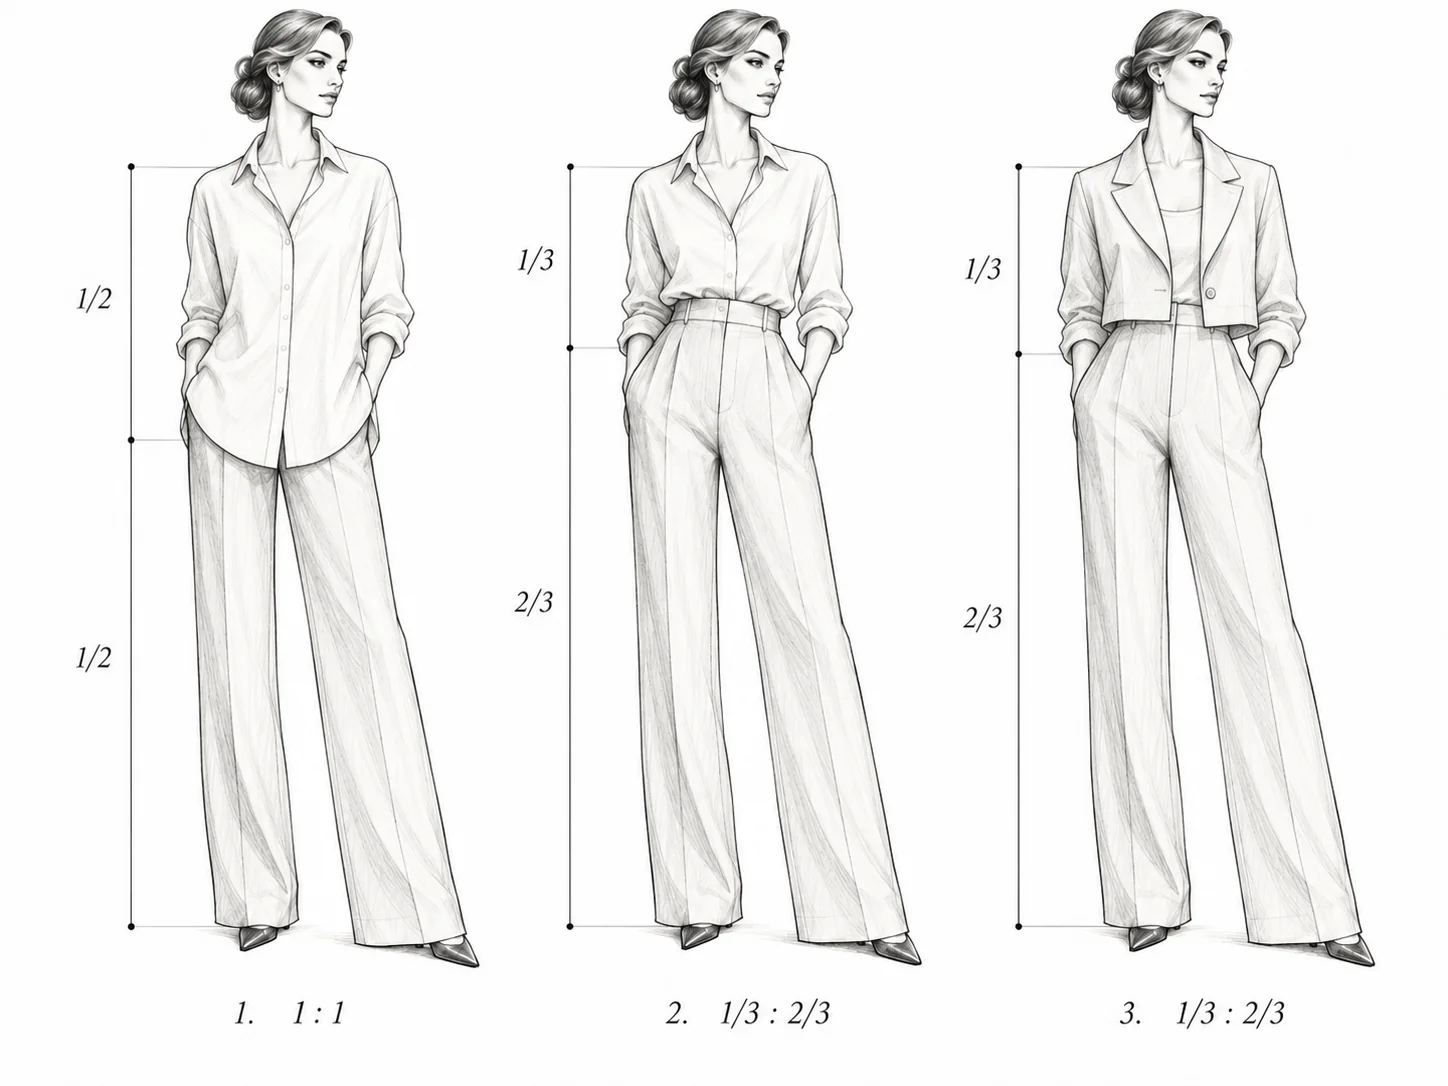
Who it's for. The rule works at almost any height and in most styles, but its effect is most noticeable if you're shorter or when clothing splits the figure roughly in half.
Be more careful experimenting with cropped trousers and capris: an extra horizontal line low on the body can throw off the ratio you're after.
Strengths and limits. The principle is simple, visual, and works across very different styles. It's easy to test on the same outfit by moving the horizontal line.
But don't apply the 1/3-to-2/3 ratio mechanically. The result depends on height, leg and torso length, the rise of the trousers, and the length of specific pieces. It's a cue, not an exact formula.
In practice. The simplest ways to shift proportions are to tuck a top into full-length trousers, mark the waist with a belt, or play with the length of the outer layer.
Try photographing the same outfit with the top untucked and tucked, and compare how the torso, legs, and overall silhouette change. Pick the version whose proportions you like more.
The waistline
How it works. The rule of thirds shows where to place the main horizontal line in an outfit; the waistline is one way to create that line and, at the same time, change the perceived ratio of torso to legs.
Where the top visually ends and the bottom begins affects how long the legs read. A high rise, a tucked or cropped top, and a belt raise that line and can make the legs look longer. A low rise does the opposite: it drops the line and gives the torso a bigger share of the silhouette.
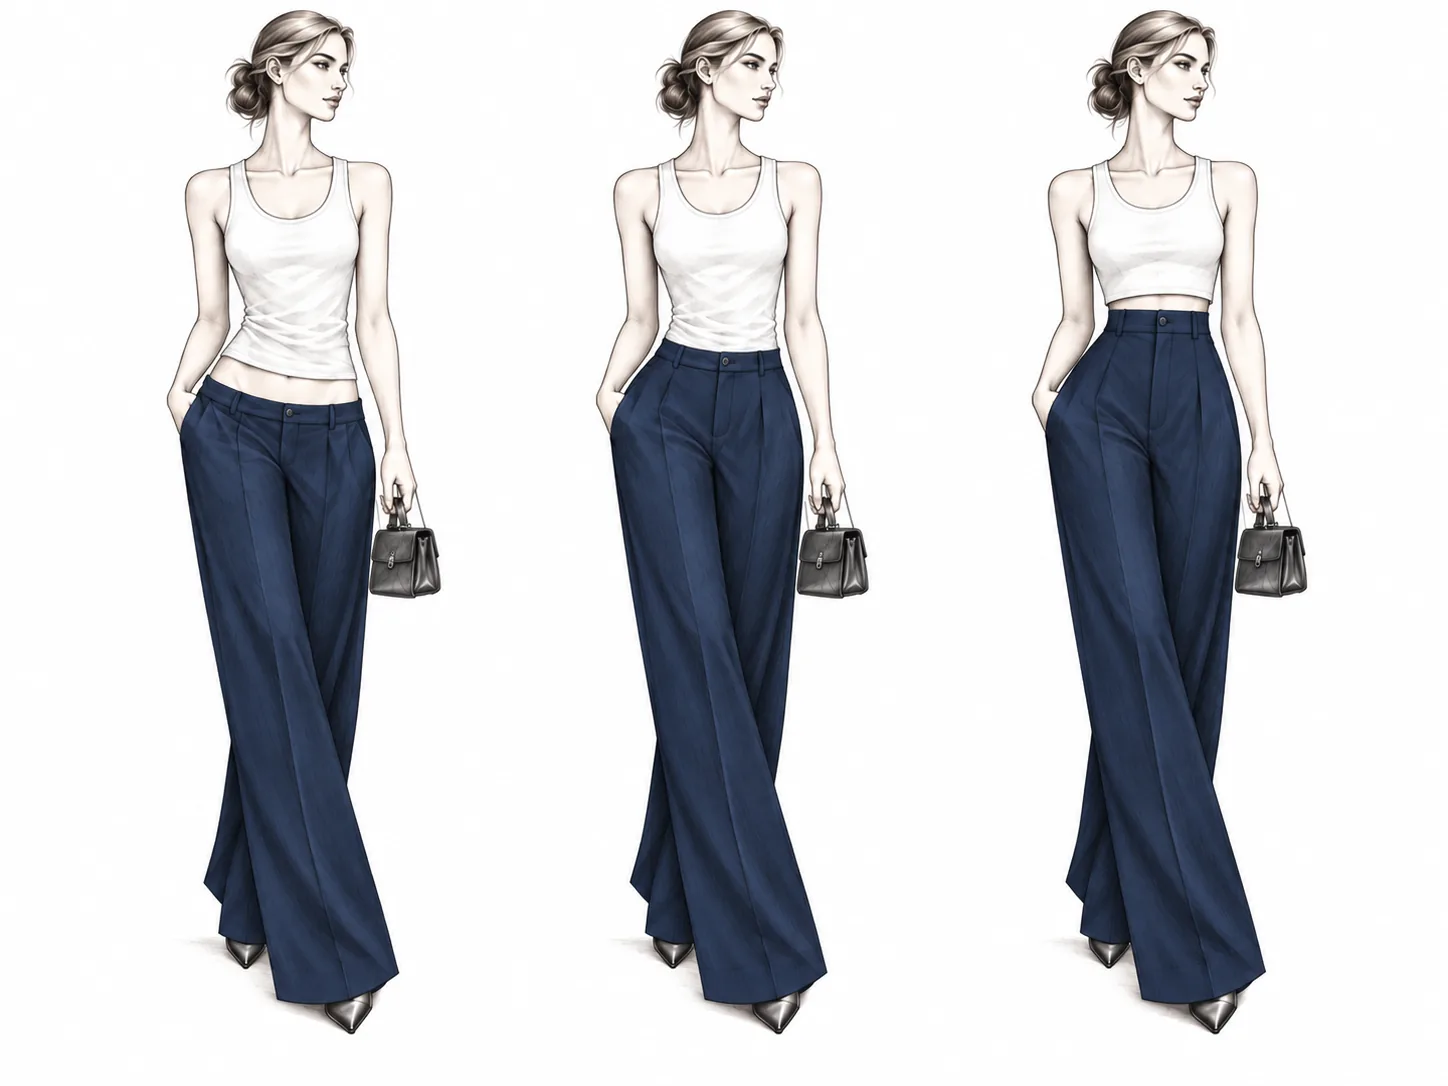
Who it's for. This line is especially worth considering if you want to adjust the ratio of torso to legs. With a relatively long torso, a higher waistline can give the legs a bigger share of the silhouette; with a short torso — especially combined with a fuller bust — it can feel tight or leave too little space between bust and waist. So there's no universal "right" rise.
Strengths and limits. It's one of the most accessible ways to change proportions with no new purchases: sometimes it's enough to tuck an existing top differently or add a belt. But the result depends on your build, the rise of the specific trousers, and the fabric of the top — a full tuck, for instance, doesn't work with every bulky or stiff material.
In practice. If a full tuck isn't for you, try a partial front tuck: it marks the waist while keeping some of the top's volume. A belt can steer proportions too — a belt matching the bottom breaks up the lower silhouette less and visually continues the line of the legs, while a contrasting one creates a clear horizontal line you can use to set the dividing point.
Balancing volume
How it works. The classic principle is to balance a voluminous piece with a more compact or fitted one: a loose top with a narrower bottom, or a wide bottom with a compact top. This keeps the silhouette more readable and spreads the volume so it doesn't take over the whole outfit.
Volume-on-volume works too. One way to keep the proportions is to crop one of the volumes — pairing wide trousers with a short, loose top, for example.
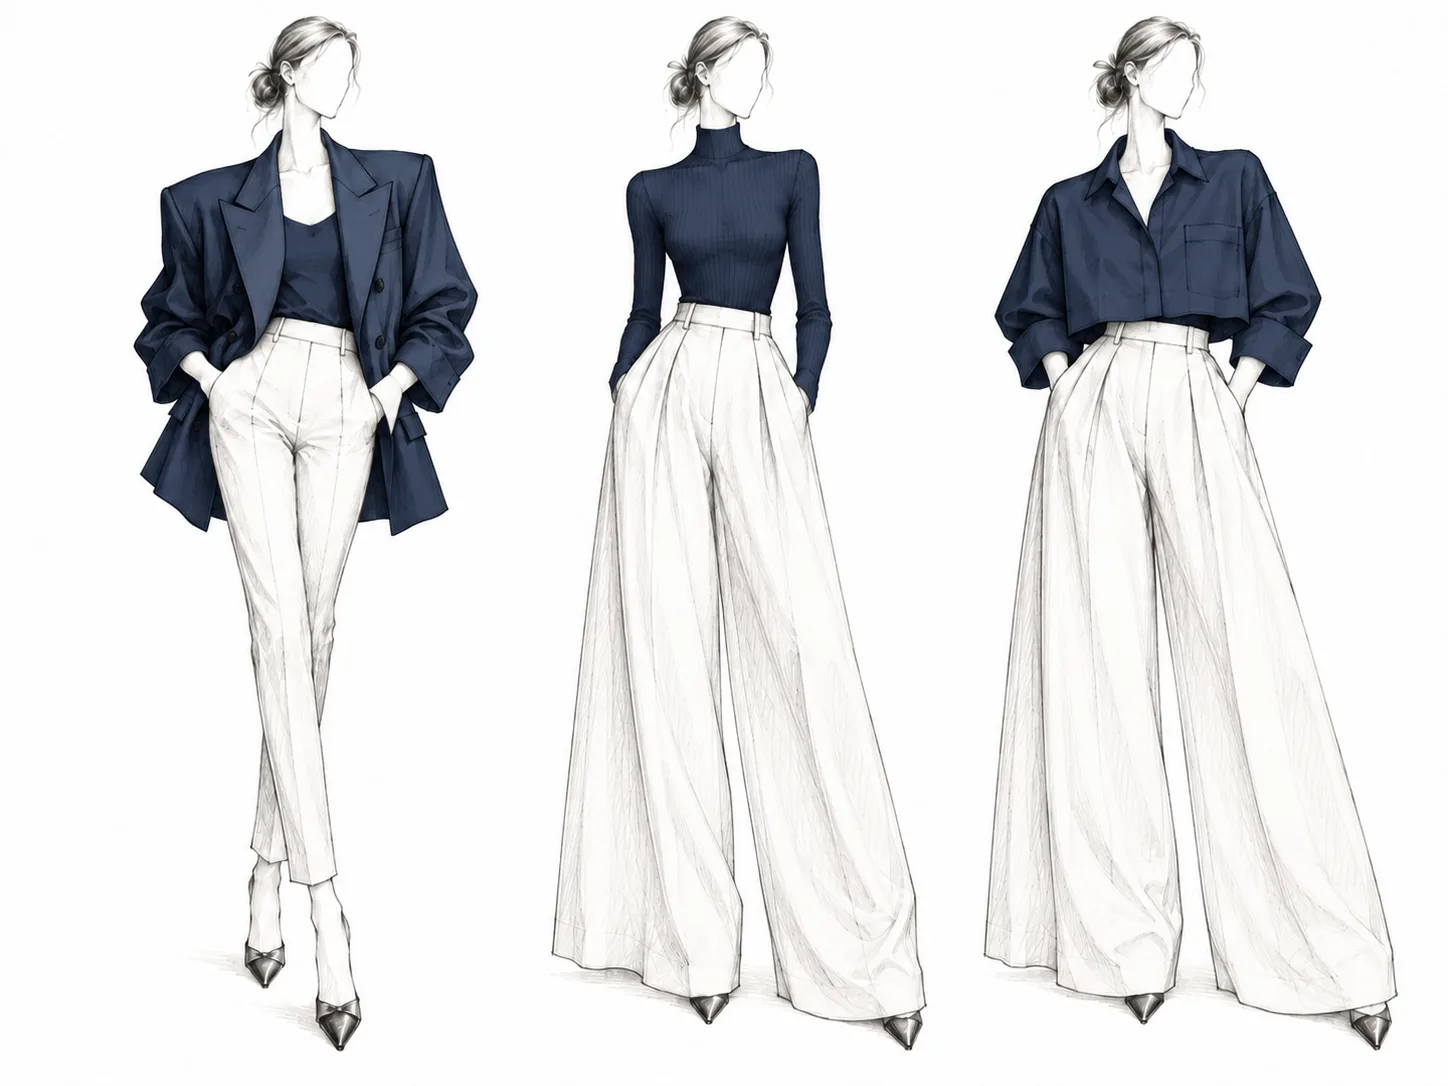
Who it's for. Mostly people who often wear oversized pieces. If you're shorter, the effect of how volume is distributed simply becomes more visible: several long, loose pieces at once can take up most of the silhouette.
Strengths and limits. Balancing volume lets you wear loose pieces while keeping the shape of the silhouette, without making the whole outfit fitted. But the literal "loose + narrow" formula gets repetitive fast. Modern fashion also embraces deliberate head-to-toe volume, so treat this as a simple cue rather than a rule.
In practice. Try wide trousers with a compact top, or an oversized sweater with straight jeans. If you tuck a voluminous shirt, the trousers may need a little more room at the waist so the fabric doesn't gather into extra folds.
The vertical line and column dressing
How it works. A vertical line is the visual effect of an unbroken line through an outfit: the eye travels down the silhouette without sharp stops, and the figure can read as more elongated. A contrasting horizontal line does the opposite — it visually splits the silhouette.
One way to create that vertical is column dressing: a top and bottom in close shades read as a single plane of color. The colors don't have to match exactly — shades close in lightness and overall color impression can create the same sense of an unbroken vertical.
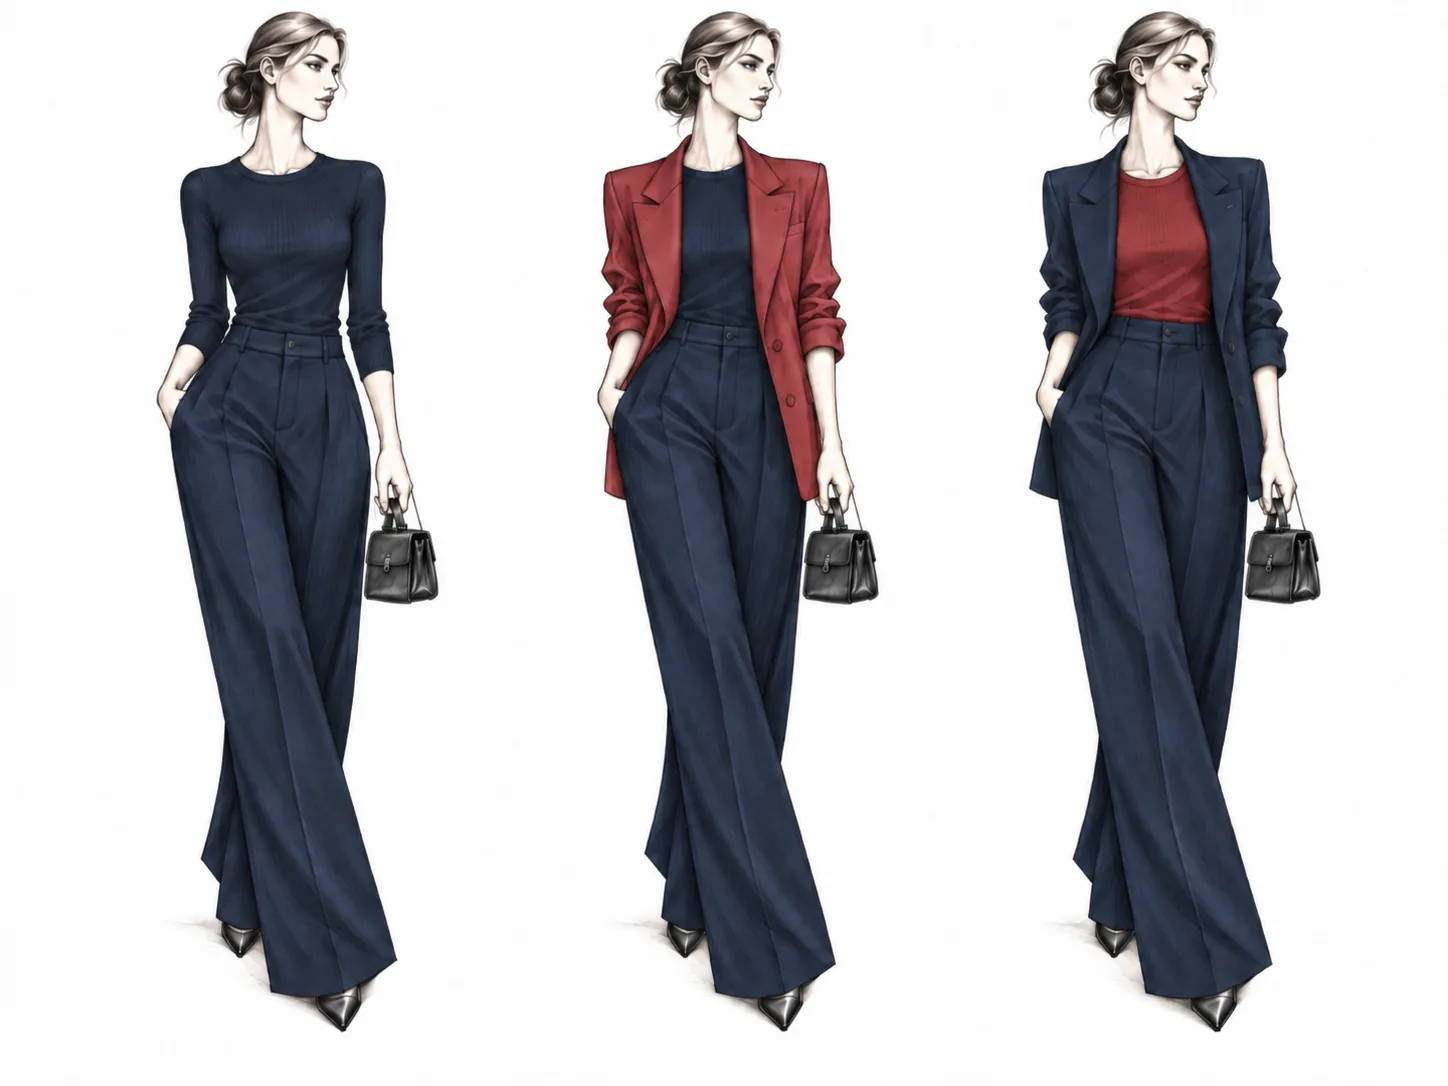
Who it's for. The effect is most noticeable if you're shorter or when you want to visually lengthen the silhouette. But column dressing also works simply as a handy formula for combining pieces quickly.
Strengths and limits. A vertical is easy to build even from basics, and close shades give more freedom than strict monochrome. That said, a one-color outfit can look flat if all the pieces are also similar in texture. And the formula needs a top and bottom close enough in color to begin with.
In practice. The most obvious option is full monochrome. Another is an inner column: a top and bottom in close colors, with a contrasting jacket, cardigan, or coat on top. You can extend the vertical with shoes matching the trousers or skirt.
There's also an outer column — a jacket or cardigan close in color to the bottom, over a contrasting top. In both cases, what matters isn't an exact color match but the sense of an unbroken line of color.
Texture
How it works. Mixing textures adds depth and makes an outfit more interesting even without extra colors. The technique relies on contrast between surfaces and materials: heavier with lighter materials, textured with smooth, matte with shiny. Chunky knit with silk, denim with smooth leather, wool with satin.
The difference in texture shows especially well in neutral and monochrome outfits: pieces close in color don't blur into one block when the materials differ.
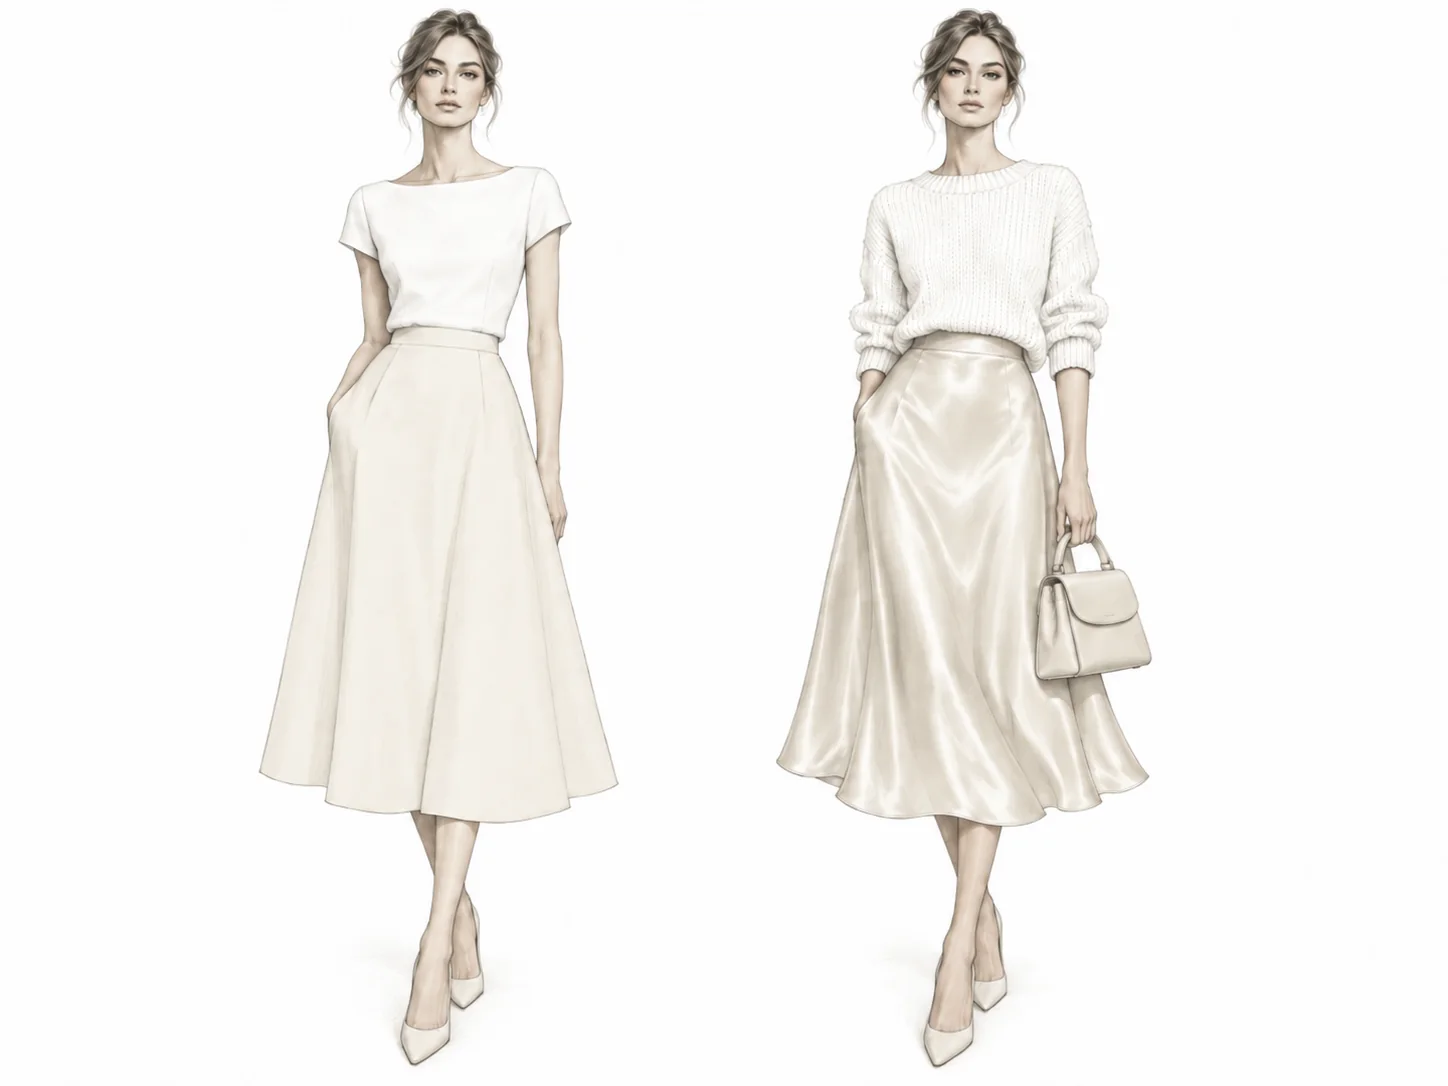
Who it's for. The move is universal, but it's especially useful in monochrome and capsule wardrobes, where the palette is limited and variety comes from combining surfaces rather than piling on colors.
Strengths and limits. Texture helps liven up a neutral outfit and mix more formal and casual pieces. It also shapes the seasonal feel: suede and corduroy feel autumnal; shearling and fur feel wintry.
At the same time, too many prominent textures at once can create visual noise. If shiny surfaces start to add up, the outfit can read as busier. For a calmer effect, pair shine with matte materials.
In practice. Start from one base texture — cotton, wool, or denim — and add a contrasting one in a piece or two, or in accessories. In a monochrome outfit you can keep the colors close and build variety through materials: knit, wool, and leather in the same color family.
Prints
How it works. Different prints are easier to combine when they share a color and differ in scale. A fine stripe next to a large floral usually competes with it less than two prints of the same size.
There are also more forgiving "base prints" — stripes, polka dots, a small check, some florals. They're easier to use as a foundation, with a more prominent pattern added on top.
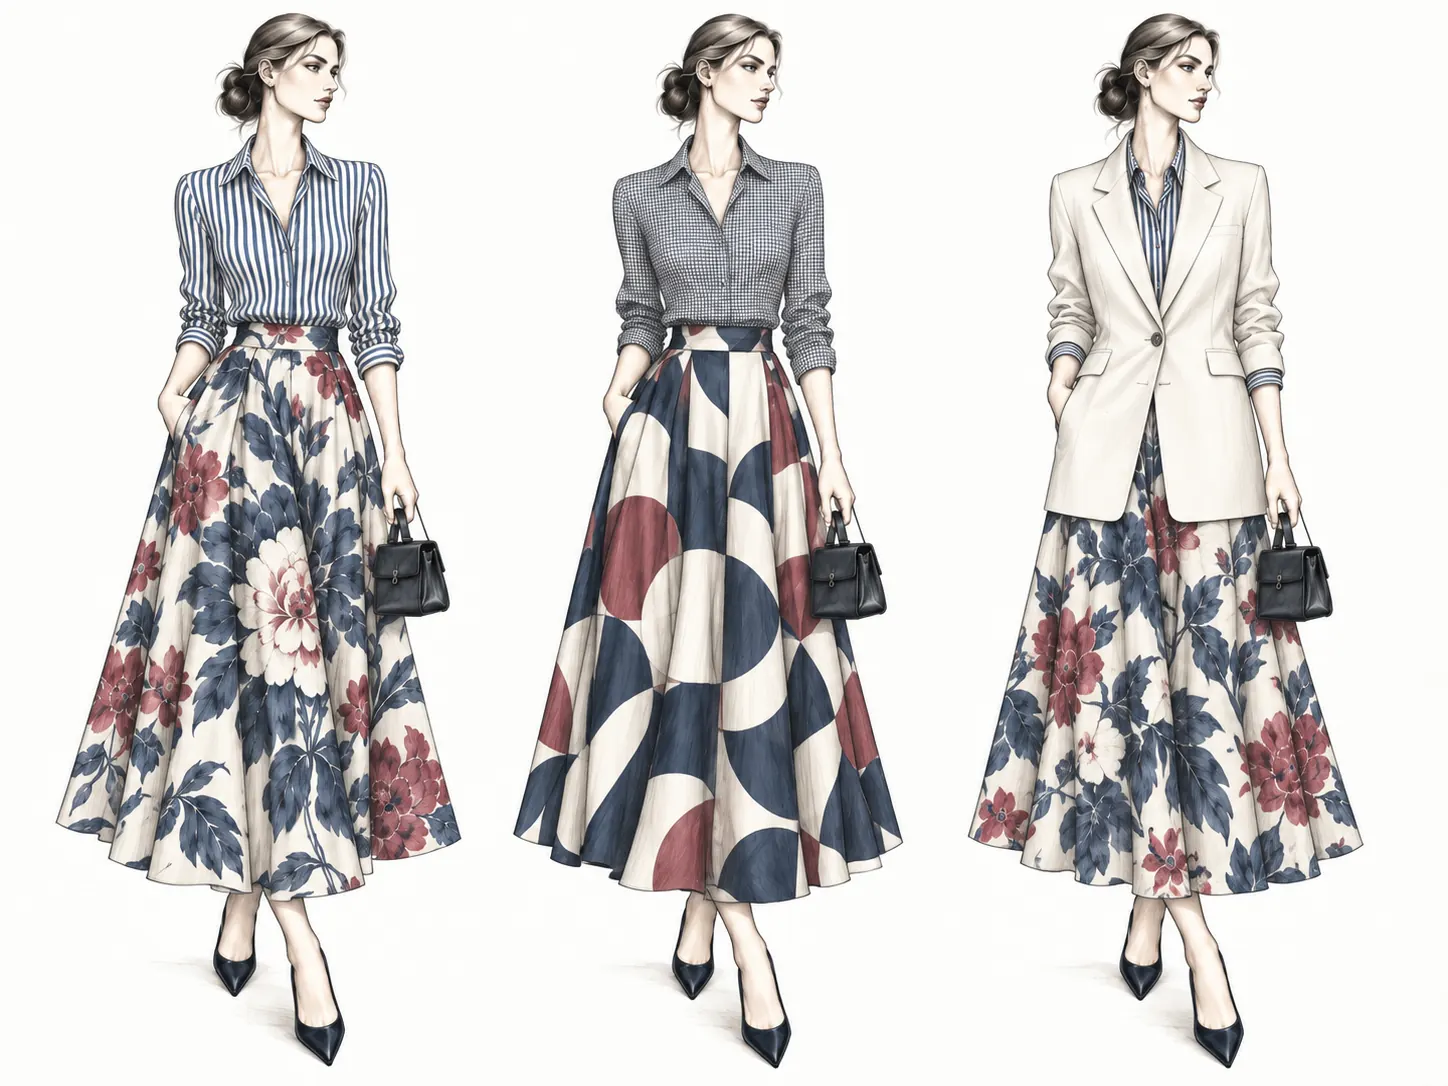
Who it's for. Anyone who wants more expressive outfits and to move gradually beyond solid colors. It's easiest to start with two quiet prints that share a color, then try one base print and one bolder one.
Higher-contrast pairings — leopard with check, say — create a more active effect and often come together more easily with a neutral piece that ties the outfit together.
Strengths and limits. Mixing prints can make an outfit more personal and memorable. But the more competing patterns there are, the higher the risk of visual noise, so color and scale matter especially here.
In practice.
- Find a shared color. If a floral has blue in it, echo that blue in the second print.
- Vary the scale. A large pattern is usually easier to pair with a smaller one than with another large one.
- Add a neutral separator. If two patterns start to compete, a solid jacket, denim, shoes, or bag can calm the pairing.
Maximalism deliberately breaks these principles, so treat them as a way to simplify print mixing, not a required scheme.
Layering
How it works. The basic principle of layering is to move from thinner, lighter layers to denser ones: the layer closest to the body is usually the thinnest and most breathable, and each one after it gets warmer and heavier. Tee → shirt → jacket, or turtleneck → cardigan → coat.
Three visible layers are a handy starting point: often enough to add depth without overcomplicating things. But the number of layers isn't a rule in itself — thickness, length, and overall volume matter more.
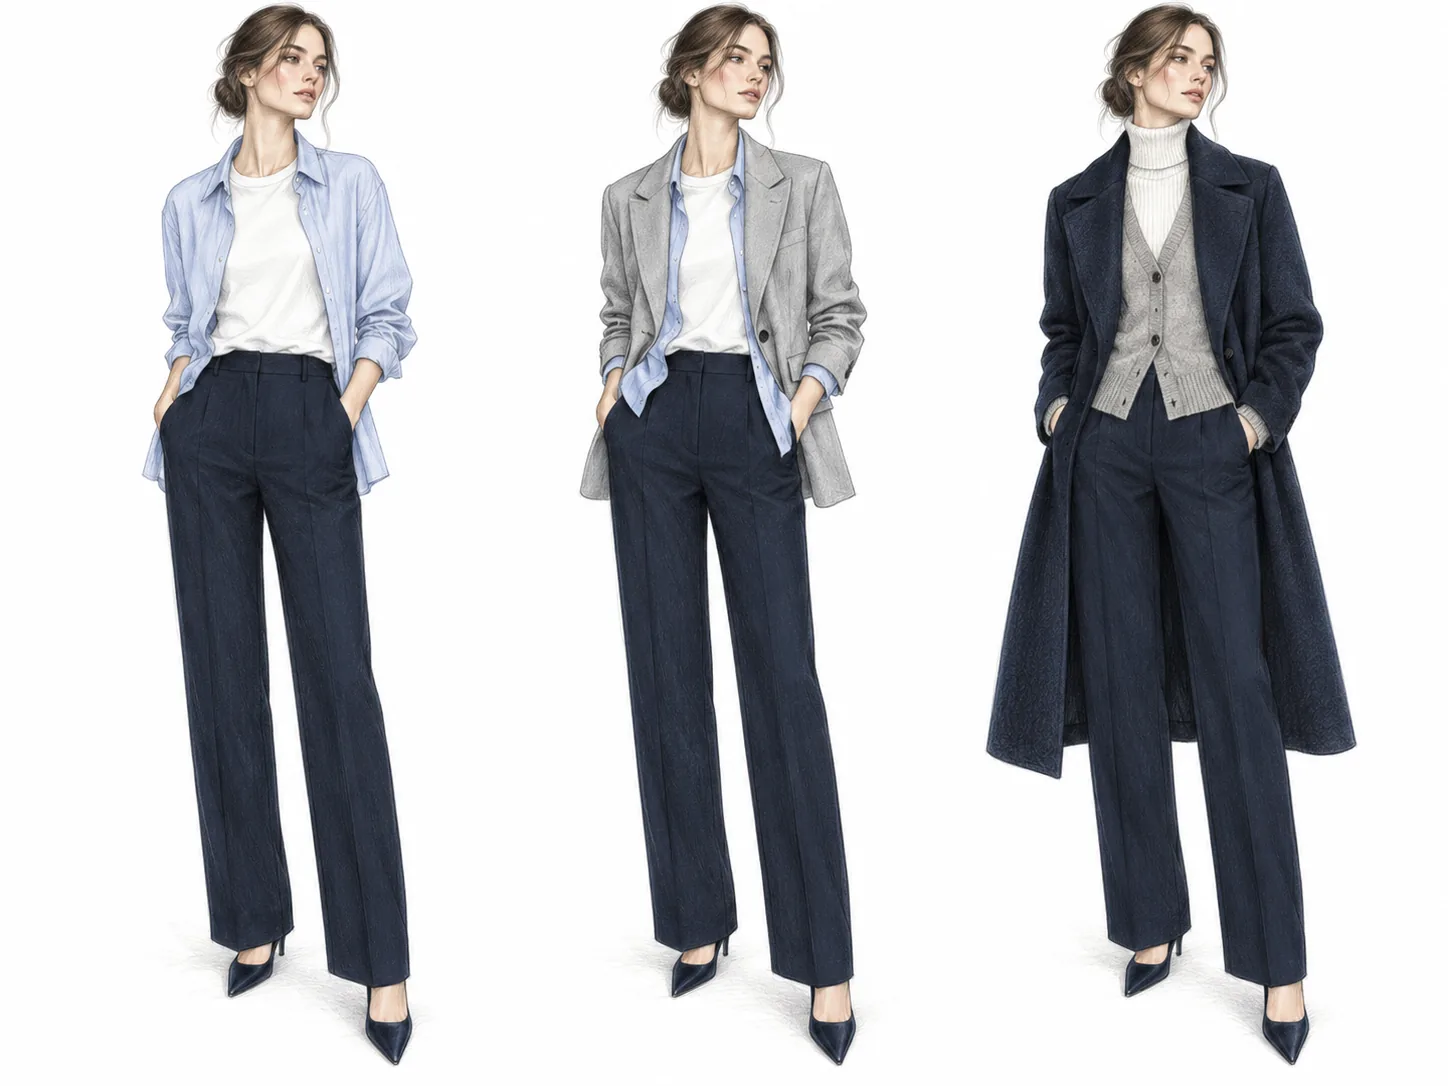
Who it's for. Mostly the transitional seasons and winter, when layers help you adapt to different temperatures indoors and out. In a hot climate, layering is naturally more limited.
Strengths and limits. Layers add warmth, let you change an outfit through the day, and add depth through mixed textures. It helps if the main layers can also stand on their own: then the outfit won't fall apart if you take off a jacket, cardigan, or coat indoors.
The main risk is excess volume. The more layers, the more the length and density matter, so pieces don't gather into stray folds or weigh the silhouette down.
In practice. The outer layer is often longer than the inner ones, but that's not a rule. A lower layer can peek out on purpose — what matters is that the difference in length reads as part of the composition.
Mix textures between layers, and make sure denser pieces don't distort thinner ones. For a calmer composition, you can try keeping lighter pieces closer to the body and darker ones in the outer layers — but that's just one option.
The focal point
How it works. The focal point is the element the eye lands on first. It can be a bright color, a print, a noticeable piece of jewelry, a bag, or another expressive detail. As in composition in art, one clear focal point helps pull an outfit together.
You can steer attention with more than a single accessory: the dominant color, the proportions, and how decoration is distributed all matter. A busy printed top, for example, usually reads more easily next to a quieter bottom.
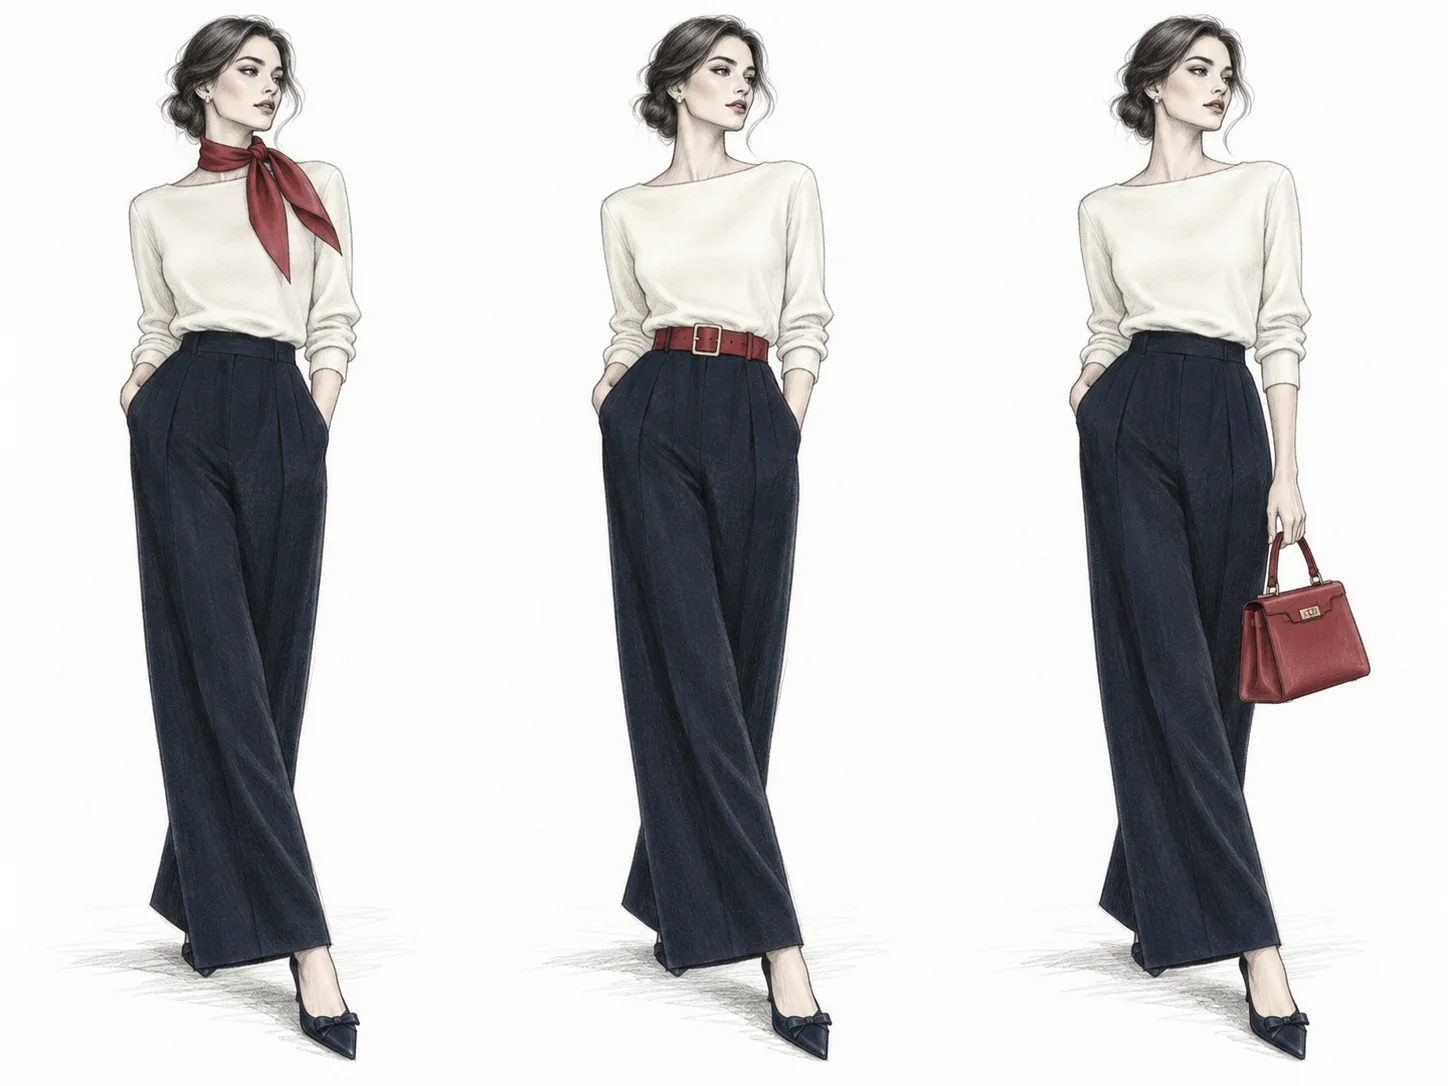
Who it's for. The move is universal and especially useful when you want to deliberately direct attention to a certain part of the outfit or highlight something you like about yourself.
Strengths and limits. It's a simple way to check an outfit: just ask yourself, "what's the main thing here?" If several noticeable elements compete for attention at once, the composition can look overloaded or less pulled-together.
But a single accent isn't a universal rule. Maximalist styles often build deliberately on several centers of attention, so the focal point is more a tool for managing composition than a required limit.
In practice. First decide what should draw the eye first: a color, a print, jewelry, a bag, or another detail. Use the rest as support. If a bright scarf or a large piece of jewelry becomes the center, keep the other colors and details quieter. If a color is the main thing, let one shade dominate and the others support it.
The third-item rule
How it works. The rule treats the top and bottom as the base of an outfit and a third piece as an extra element that makes the outfit look more pulled together and expressive. With jeans and a tee, that third piece could be a jacket, a cardigan, a vest, a second-layer shirt, a scarf, or a statement piece of jewelry.
The point isn't the literal number three so much as adding one more layer or accent to the base combination. Sometimes that single detail is enough to make a simple combination feel like a more considered outfit.
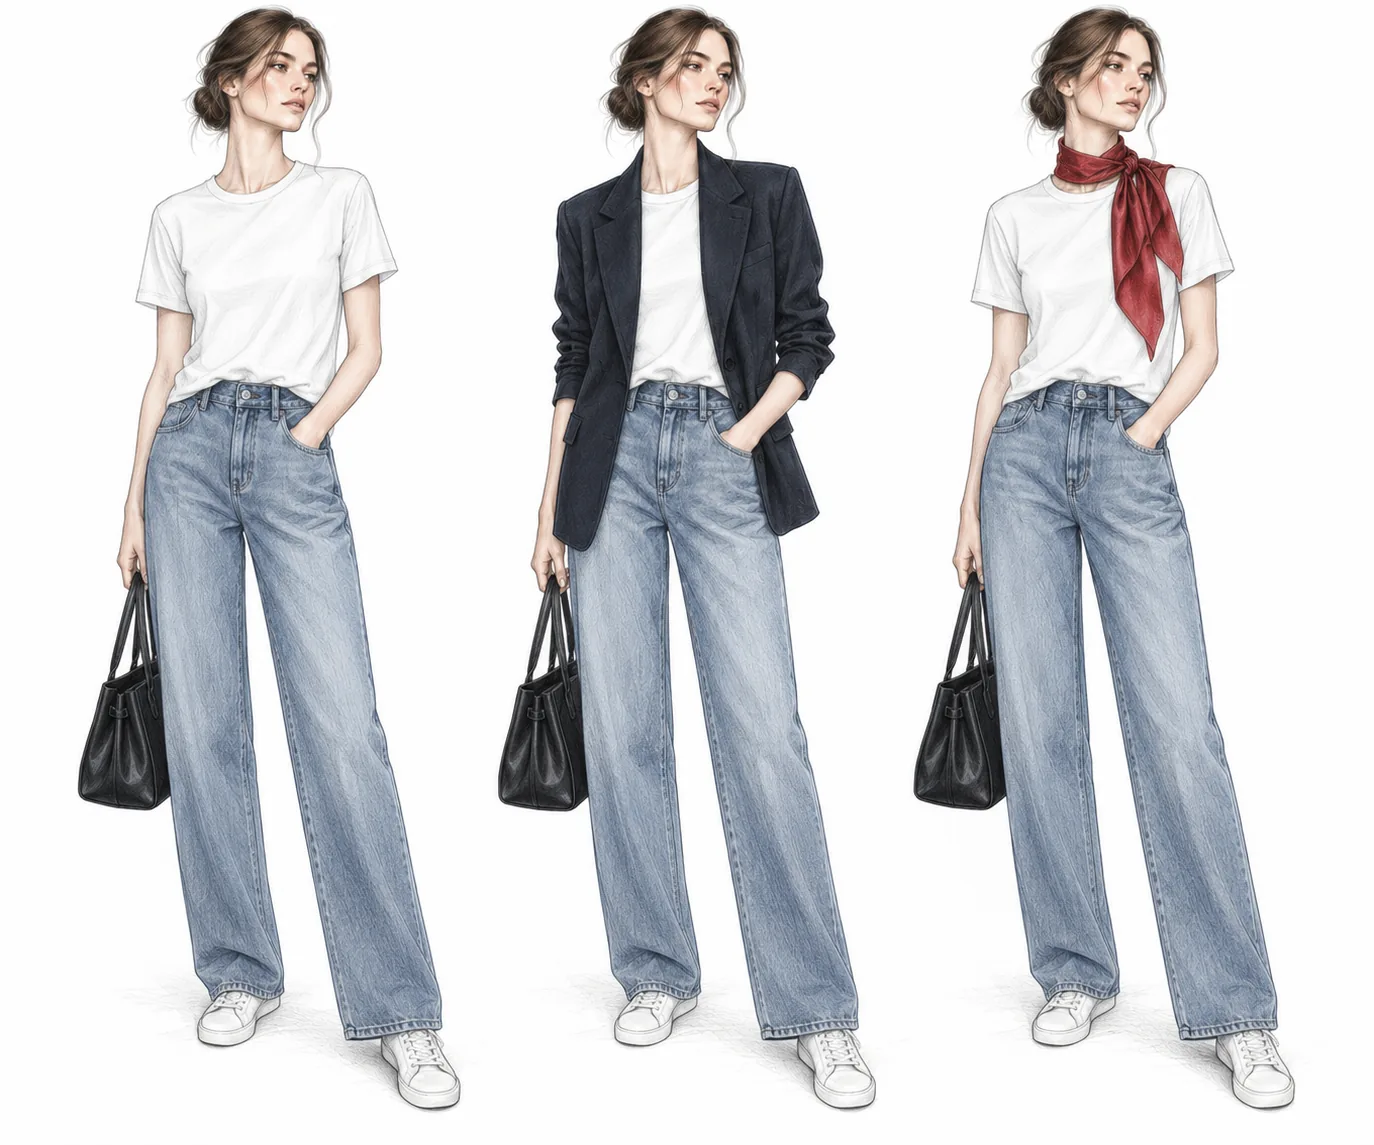
Who it's for. Especially useful for anyone who often wears basics and feels their outfits come out too neutral or plain. In hot weather and in sporty, very functional outfits the technique is less useful: an extra layer or accessory may simply not be needed.
Strengths and limits. The rule is a quick way to make a basic set more interesting and helps you use the same pieces in different ways.
But the line between what counts as a "third item" is fairly loose. Different versions include not just clothing but a scarf, jewelry, and sometimes even lipstick or a hairstyle. There's also criticism of the rule's commercial logic: it's often linked to training for fashion-retail staff, where suggesting one more piece both made the outfit look more finished and could nudge extra sales. The exact origin isn't confirmed.
In practice. The simplest formula is jeans + tee + a jacket, cardigan, or leather jacket. The third element can also be an accessory — a scarf or a statement piece of jewelry.
But you don't have to count pieces literally. If an outfit already looks complete, there's no need to add a third piece just for the rule: a white shirt and well-fitting trousers, for instance, often need nothing more.
Accessories
How it works. Accessories act as the finishing layer of an outfit: they can create a focal point, add texture, color, or shine, and make a basic combination more expressive. The same base outfit can look different depending on the bag, belt, scarf, or jewelry.
An accessory doesn't have to be noticeable. Sometimes its job isn't to draw attention but to support the colors, proportions, or overall character of the outfit.
Who it's for. The move is universal but especially useful with a small wardrobe. By swapping accessories, you can get different versions of an outfit from the same pieces without constantly adding new clothes.
Strengths and limits. Accessories make it relatively easy to change the character of familiar outfits — more pulled-together, more expressive, or, on the contrary, quieter.
There's no universal number of accessories. One noticeable element can become the focal point, while several can work together if they support the overall composition. So it matters less to count accessories than to see what role each one plays in the outfit.
In practice. Start with one element and decide its job. A bright bag or scarf can be the focal point, a belt can mark the waist, jewelry can add shine, and leather, metal, or silk can add a new texture.
If you want to add several accessories, check whether they're linked by color, material, or overall mood — and whether they start competing for attention at the same time.
See also: Color in outfits. Back to the overview — How to Put Together Outfits.
Need help?
Contact us at support@getwardrobe.com